Turn on Apache
- Open Terminal by clicking on the magnifying glass at the top right corner of your screen and searching for Terminal
- Type
sudo apachectl start and press enter
- Open Safari (or your browser of choice), type localhost in the address bar, and press enter
Can’t believe it’s that easy? It is! You should now see It works! in the browser.
![]()
Turn on PHP
Mac already comes with PHP, so you don’t need to install it from PHP.net. Before High Sierra (version 10.13), Mac came with PHP 5 installed. This caused users to get annoyed because it didn’t come with PHP 7, so you’d have to go through extra work to upgrade from PHP 5 to PHP 7. Thankfully High Sierra already comes with PHP 7.1!!!
- Open Terminal and type
sudo nano /etc/apache2/httpd.conf and press enter
- Press Ctrl+W which will bring up a search
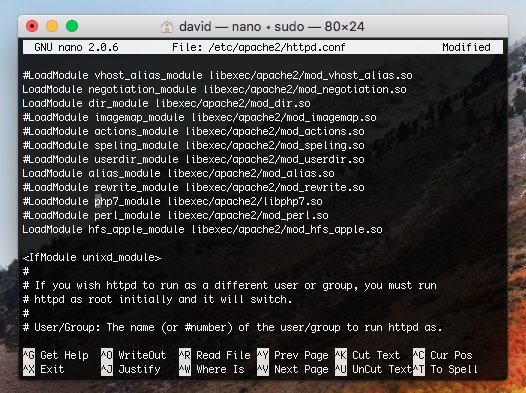
- Search for php and press enter. You’ll see the following:
![]()
- Delete the # from
#LoadModule php7_module libexec/apache2/libphp7.so
![]()
- Press Ctrl+O followed by Enter to save the change you just made
- Press Ctrl+X to exit nano
- Type
sudo apachectl restart and press enter
![]()
You just turned PHP 7 on. Great work so far!
Create Sites Folder
- Click on Finder at the bottom left corner of your screen and click on Go > Home the top navigation bar. This will take you to your home directory, which will also be whatever your computer is named; in this case it's david.
- Create a new folder and name it Sites (The Safari icon shown below gets added automatically to the Sites folder as shown below)
![]()
- Open your favorite text editor and create a file called index.php with the following code:
<?php
echo "Hello From Sites Folder!";
phpinfo();
?>
- Save index.php in the Sites folder you created
- Go back to Terminal and enter
sudo nano /etc/apache2/httpd.conf
- Press Ctrl+W to bring up search
- Search for Library and press enter. You should see this:
![]()
- Replace both occurrences of
/Library/WebServer/Documents with /Users/david/Sites (instead of david use your name which can be found at the top of your terminal next to the home icon)
![]()
- Press Ctrl+O followed by Enter to save these changes
- Press Ctrl+X to exit nano
- Type
sudo apachectl restart and press enter
Go back to Safari and refresh the localhost page and you’ll see Hello From Sites Folder! with PHP info that shows PHP 7 is being used.
![]()
Install MySQL
- Go to https://dev.mysql.com/downloads/mysql
- Scroll down until you see three download buttons and click on the one next to DMG Archive
![]()
- Scroll down and click No thanks, just start my download
- Click on the downloaded file, double click the pkg file, and go through the installation which should look like this:
![]()
- Once you get to the end of the installation, you’ll see a popup that gives you your MySQL username (root) and password (8hxKsiIh?YMt). Your password will be different. Copy the password to text file (or take a screenshot) and press okay. Do this now, as it will be pain to reset the password if you don't know it.
![]()
- Press the Apple logo at the top left of your screen and go to System Preferences
- Click on MySQL and you’ll see that it’s turned off
![]()
- Press Start MySQL Server to turn it on and you’ll see:
![]()
- Go back to Terminal and type
sudo /usr/local/mysql/bin/mysql -u root -p
- When you press enter it will ask you for your Password. This is the password you use when you login to your Mac
- Then it says Enter Password: which is 8hxKsiIh?YMt for me (you should use the password you copied earlier instead of 8hxKsiIh?YMt). You’ll see this screen:
![]()
- Type
ALTER USER 'root'@'localhost' IDENTIFIED BY 'newpassword'; and press enter
![]()
- Go to https://www.sequelpro.com and download Sequel Pro. This is like phpMyAdmin, but better because it’s a desktop app.
- Go through the installation, open Sequel Pro, and enter 127.0.0.1 for the Host. Enter root for the Username and newpassword for the Password. Press Connect
![]()
- Click Choose Database… at the top left followed by Add Database…
- Give it the name mydb and press enter
- Then click the plus sign at the bottom left to create a new table. Name the table mytable and press add
- Click the plus sign right above the word INDEXES and name the field message. Set the type to VARCHAR and give it a length of 200.
- Click on Content at the top.
- Click the plus sign at the bottom (the one to the left of the minus sign)
- Give the new entry an id of 1 and set the message to MySQL works perfectly!
![]()
- Open index.php in your Sites folder and change the code to
<?php
$con = new mysqli("127.0.0.1", "root", "newpassword", "mydb");
$message = $con->query("SELECT message FROM myTable")->fetch_object()->message;
$con->close();
echo "$message <br/>";
echo "Hello From Sites Folder!";
phpinfo();
Obviously this example is immune to SQL injection, since there are no user-inputted values. However, if you don’t understand MySQLi prepared statements as well as you’d like, check out this post for an excellent tutorial on how to prevent SQL injection 😉. There's even a PDO version, if you prefer that more.
- Refresh localhost on Safari and you should see:
![]()
Great! You now have MySQL working, so you can use localhost to store information in databases.
Make SEO Friendly URLs Work
Instead of going to localhost/profile.php?user=david, it looks nicer when you can go to localhost/profile/david. Let’s make this work by enabling mod_rewrite so you can use RewriteRules.
- Go to Terminal and type
sudo nano /etc/apache2/httpd.conf followed by pressing enter
- Press Ctrl+W, type rewrite, and press enter
- Remove the # in
#LoadModule rewrite_module libexec/apache2/mod_rewrite.so
![]()
- Press Ctrl+O followed by Enter to save
- Press Ctrl+X to exit nano
- Type
sudo apachectl restart
Now you can use friendly URLs when you develop using localhost.
Make .htaccess Work
This isn't necessary to make vanity URLs work, but I personally prefer using an .htaccess file, as it allows me version control it.
- Go to Terminal and type
sudo nano /etc/apache2/httpd.conf followed by pressing enter
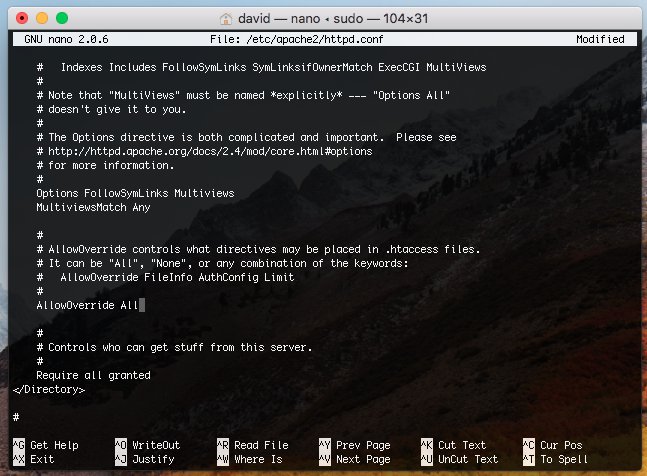
- Press Ctrl+W, type
AllowOverride controls, and press enter
- Change
AllowOverride None to AllowOverride All
![]()
- Press Ctrl+O followed by Enter to save
- Press Ctrl+X to exit nano
- Type
sudo apachectl restart
Now you can add a .htaccess file in the Sites folder and it will work well.
Turn On SSL/HTTPS
Instead of accessing your website through localhost, you might want to access your website by going to https://localhost. If you turn on SSL, you’ll see a padlock next to localhost in the URL bar.
- Go to Terminal and type
sudo nano /etc/apache2/httpd.conf followed by pressing enter
- Press Ctrl+W, type socache_shmcb_module, and press enter
![]()
- Delete the # from
#LoadModule socache_shmcb_module libexec/apache2/mod_socache_shmcb.so
- Press Ctrl+W, type mod_ssl, and press enter
- Delete the # from
#LoadModule ssl_module libexec/apache2/mod_ssl.so
- Press Ctrl+W, type httpd-ssl, and press enter
- Delete the # from
#Include /private/etc/apache2/extra/httpd-ssl.conf
- Press Ctrl+O followed by Enter to save
- Press Ctrl+X to exit nano
- Type
sudo nano /etc/apache2/extra/httpd-ssl.conf and press enter
- Press Ctrl+W, type ServerName, and press enter
![]()
- Replace www.example.com:443 with localhost
- Right above you’ll see
/Library/WebServer/Documents. Replace that with /Users/david/Sites. (Use your name instead of david just like you did earlier)
- Right underneath
<VirtualHost_default_:443> add (but make sure to replace david with your name):
<Directory "/Users/david/Sites">
  Options All
  MultiviewsMatch Any
  AllowOverride All
  Require all granted
</Directory>
- Your terminal should now look like this:
![]()
- Press Ctrl+O followed by Enter to save
- Press Ctrl+X to exit nano
- Type
sudo nano /etc/ssl/openssl.cnf and press enter
- At the bottom of openssl.cnf add this:
[ san ]
subjectAltName                  = DNS:localhost
- Your terminal should look like this:
![]()
- Press Ctrl+O followed by Enter to save
- Press Ctrl+X to exit nano
- Type
sudo openssl req -extensions san -config /etc/ssl/openssl.cnf -x509 -nodes -newkey rsa:4096 -keyout /private/etc/apache2/server.key -out /private/etc/apache2/server.crt -days 365 -subj "/C=US/ST=Florida/L=Boca Raton/O=WebsiteBeaver/CN=localhost"
and press enter. (You can use your information instead, but don’t change localhost)
- Type
sudo security add-trusted-cert -d -r trustRoot -k /Library/Keychains/System.keychain /private/etc/apache2/server.crt
and press enter
- Type
sudo apachectl restart
- Now go to https://localhost in your browser, and you’ll see a padlock next to the url which means you’re done setting up SSL!
As always, if you have any questions please leave them in the comments, and we’ll do our best to help you.